Disclosure: Some links in this article are affiliate links. We may earn a commission on qualifying purchases at no extra cost to you.
Most RC boat owners chase speed the expensive way: bigger motor, more cells, a new ESC. But before any of that, the propeller on your shaft right now is probably unbalanced, and your transom probably has no trim tabs at all. Those two facts alone are costing you real mph — for the price of a cheap tool and an evening on the workbench.
This guide covers the tuning work that happens between the hull and the water: balancing and sharpening the prop you already own, picking the right diameter and pitch for your hull, setting trim tabs to numbers you can actually measure, getting your center of gravity right, and keeping control past the point where 2.4GHz starts getting flaky. None of it requires a soldering iron or a new battery pack.
It also requires slowing down on two very common assumptions. First, "bigger prop = faster" is backwards more often than not — over-propping is the single most common way RTR owners cook an ESC or motor. Second, a boat that rolls side to side at speed and a boat that veers off to one side are two different problems with two different fixes, and mixing them up wastes a lot of trial-and-error runs.
Everything below assumes you're starting from a running RTR or ARTR — a Traxxas Spartan, Pro Boat Sonicwake, DCB M41, or similar — and want more speed and more control without touching the motor or ESC.
What You'll Need
- A magnetic propeller balancer (not the friction-cone type — magnetic suspension shows imbalance far more clearly)
- Fine file or 800–1200 grit sandpaper, for removing material from a heavy blade
- Your stock propeller, plus a spare or two if you're testing different pitch/diameter combos
- A trim tab kit sized to fit your transom width, with mounting screws
- A small Phillips screwdriver and a ruler or calipers
- A stopwatch or your phone's timer, for the heat-test routine below
- Calm water and a few throttle runs' worth of battery — this is iterative, not one-and-done
Before You Start — Know Your Failure Modes
Three things go wrong at speed, and they get confused constantly in forum threads and in most "make your boat faster" articles. Sorting them out first saves you from chasing the wrong fix.
Prop walk is a boat that consistently veers to one side, usually right, under power. It's a function of propeller rotation torque, not instability, and it's corrected with rudder trim and a slight strut offset — not trim tabs.
Chine walk is side-to-side rocking or rolling that shows up as speed climbs, typically past 50 mph on the boats this site covers. It happens because the hull's waterline narrows as the boat rises onto plane, giving it less to balance on. The fix is a combination of things: settling the hull lower in the water, raising the strut slightly, offsetting the strut to counter torque roll, running a smaller-diameter or less "lifting" prop, and trim tabs.
Blowover is the boat's bow lifting until it flips backward — the most dangerous of the three, and the one to fix immediately if you see it starting. It means too much bow lift: lower the trim tabs, move weight (usually the battery) forward, and reduce strut angle if adjustable.
Heat is the fourth failure mode, and it doesn't show up as an obvious symptom until something's already damaged. An over-propped setup draws more current than the motor and ESC are rated for, and that shows up as temperature, not vibration — which is why the heat test below matters more than it sounds like it should.
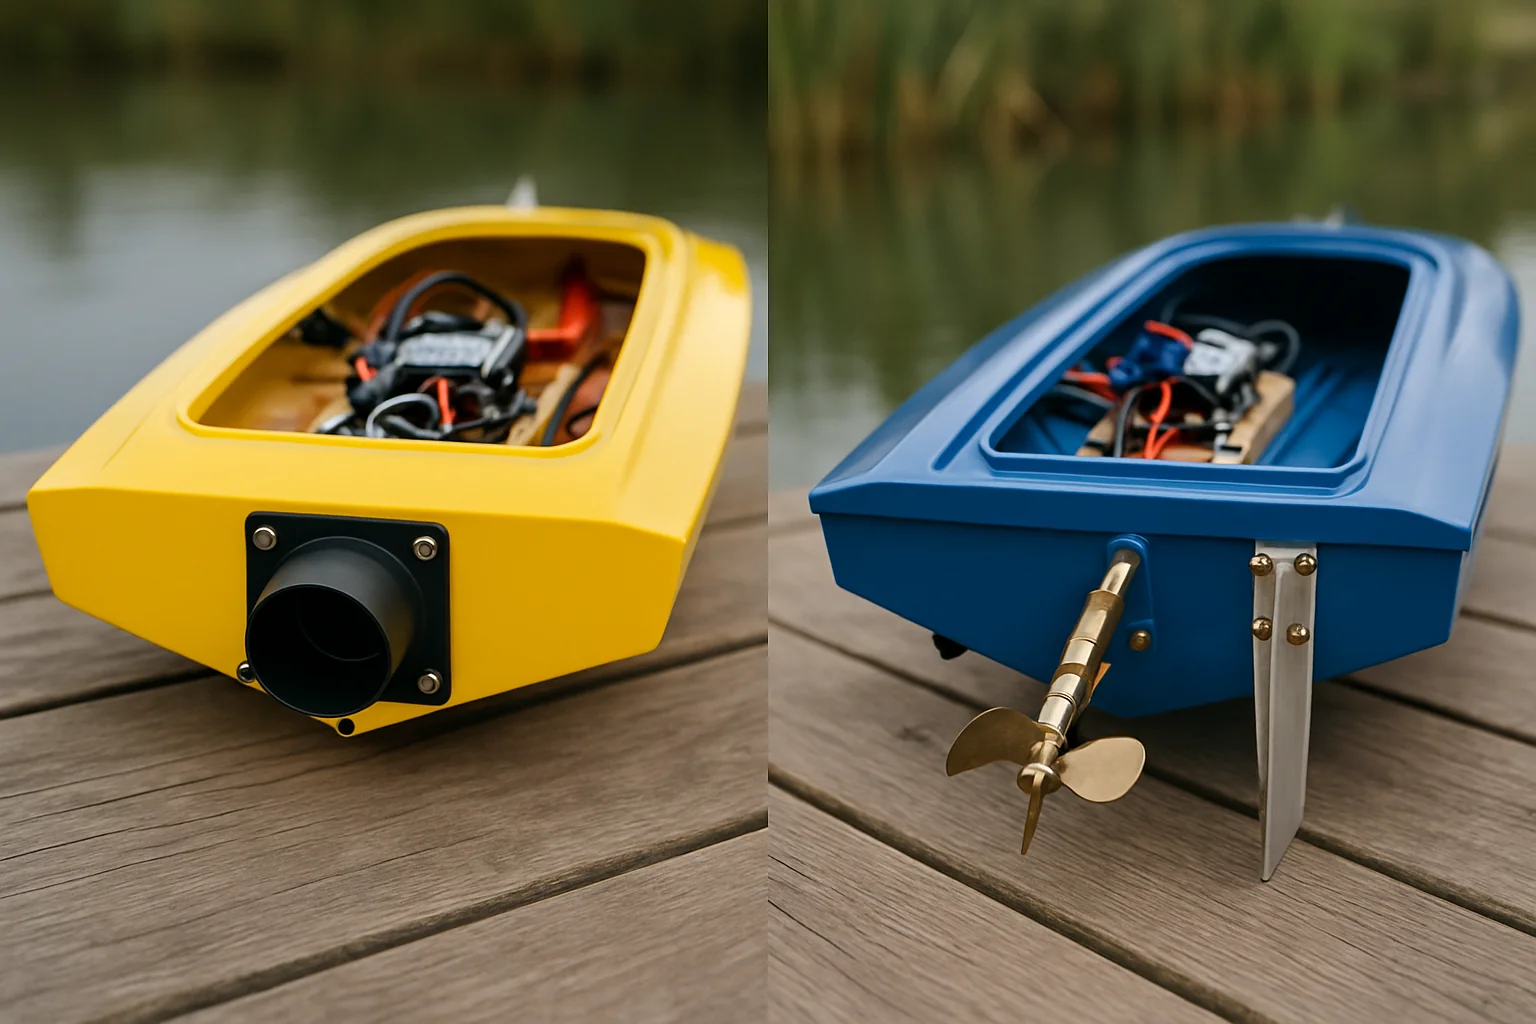
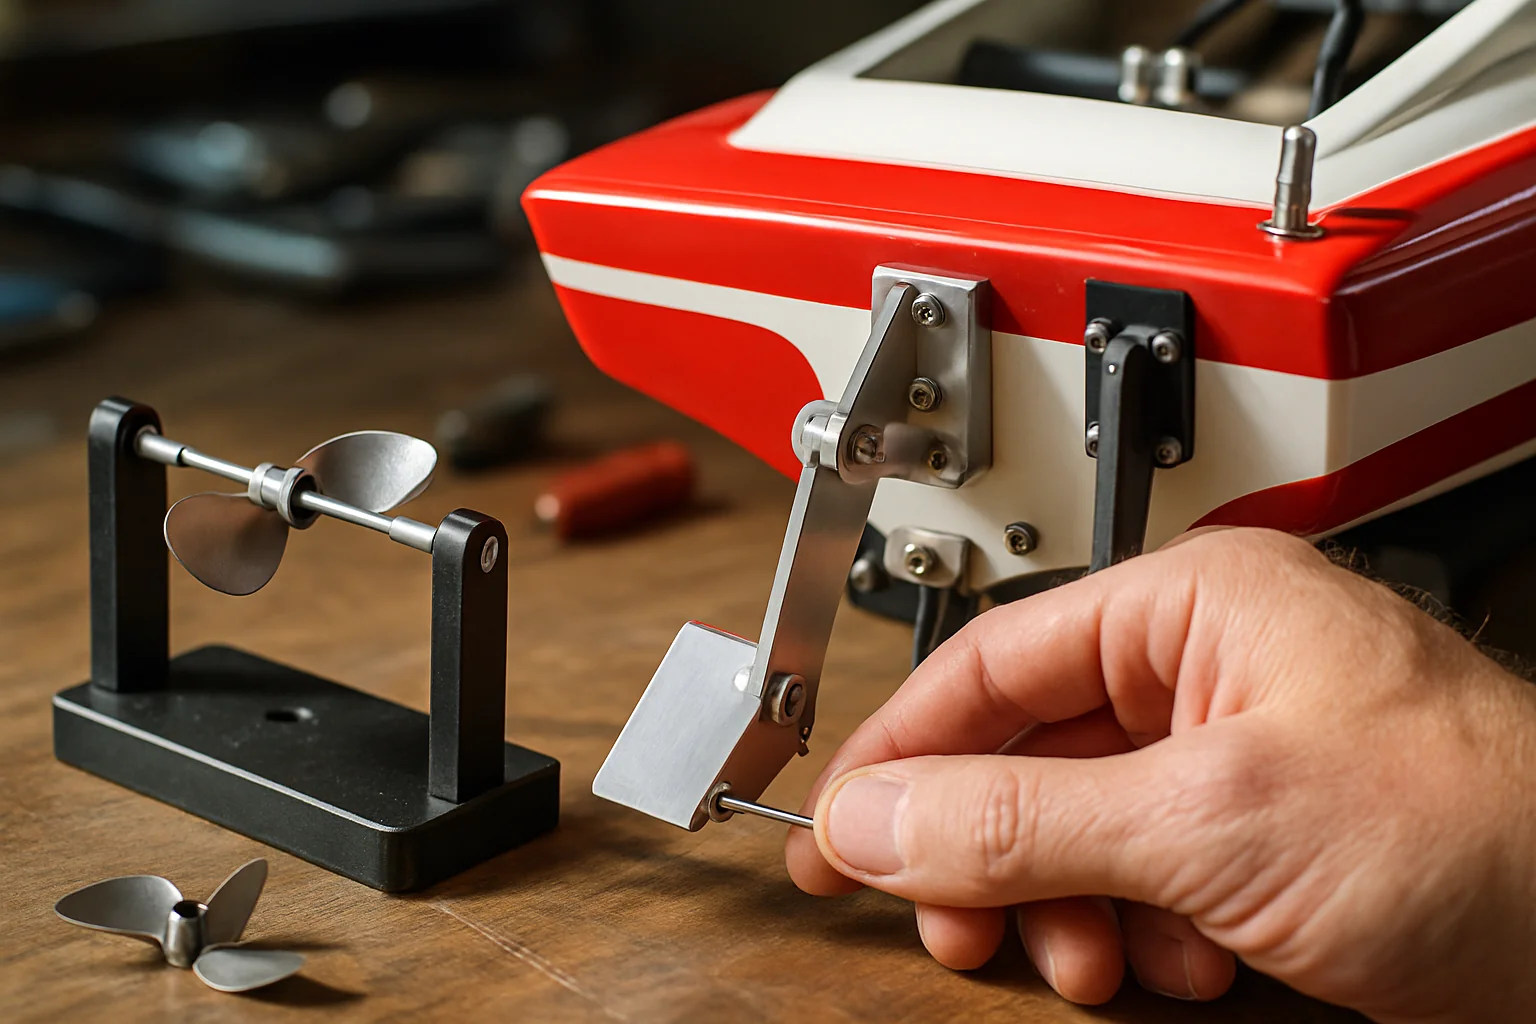
Step 1 — Balance and Sharpen Your Propeller
This is the highest-value, lowest-cost step in the entire guide, and it's the one almost no other "faster RC boat" article covers in any depth. An unbalanced prop runs hotter, vibrates, wears the shaft bearing and stuffing tube faster, and caps your top speed below what the same prop could do balanced.
Mount the prop on a magnetic balancer sized to your shaft — most balancers cover 1/8", 3/16", 1/4", and metric 2mm–5mm shafts in one unit, which matters if you run more than one boat. The Integy Magnetic Prop Balancer covers all of those sizes in one aluminum unit; a lower-cost alternative that covers the same shaft range is this aluminum magnetic balancer.
With the prop mounted, let it spin freely. The heavy blade will settle to the bottom every time — that's your imbalance. Mark it, remove a small amount of material from the back (non-thrust) side of that blade with a fine file or 800–1200 grit paper, and recheck. Repeat in small passes; it's much easier to remove a little more material than to put it back. Keep going until the prop settles randomly instead of always to the same blade.
Once it's balanced, sharpen the leading edges lightly with the same fine paper. A sharpened, balanced prop spins with noticeably less buzz and vibration than a stock one, and it runs cooler at the same throttle setting — which is exactly the headroom you want before touching pitch or diameter.
The gains here are not theoretical. Owners running a balanced and lightly reworked prop on a 6S Sonicwake have reported jumps from roughly 48 to 56 mph with no other changes, and from 31 to 41 mph on a 3S-powered Recoil 2 — with no increase in running temperature, because a balanced prop is inherently more efficient than an unbalanced one at the same RPM.
Step 2 — Choose the Right Prop: Diameter vs. Pitch
Once your current prop is balanced, the next question is whether it's even the right prop for your hull and power system. This is where "bigger prop = faster" goes wrong most often.
Diameter is thrust. Pitch is speed. A larger-diameter prop bites more water and accelerates harder off the hole, but it also loads the motor more per revolution — more current, more heat, lower RPM ceiling. A higher-pitch prop covers more distance per revolution at the same RPM, which raises top speed, but it also raises load and can push a boat that isn't ready for it into cavitation instead of speed.
As a working rule pulled from full-scale prop math that translates directly to RC: each additional inch of pitch shifts wide-open-throttle RPM by roughly 200 RPM. That's a useful sanity check when you're comparing two props on paper before you commit to buying one.
| Change | Effect | Risk |
|---|---|---|
| +diameter, same pitch | More thrust / hole shot | More current draw, more heat |
| Same diameter, +pitch | Higher top speed | More load, cavitation risk on underpowered setups |
| −diameter, +pitch | Speed-focused (riggers, hydros) | Needs a hull designed to plane cleanly at speed |
| Prop material upgrade (composite → aluminum → beryllium-copper/stainless) | Stiffer blade holds shape at RPM, less flex loss | Cost; stiffer prop transmits more load to the driveline |
If you're running a stock RTR like a Sonicwake or Spartan, the safest upgrade path is +2mm of diameter over stock with pitch unchanged — commonly good for another 5–6 mph on these platforms without pushing the motor or ESC past their design margin. Go further than that and you're now also asking for more power, which usually means better cooling (a dual-pickup rudder, for instance) before it means a bigger prop.
For a Sonicwake or similar boat on a 3/16" shaft, the Pro Boat 1.73×1.6 propeller is the common stock-replacement baseline to start from before stepping up in diameter or pitch. Owners of the smaller Sonicwake 24 running a 4mm shaft typically look at the aluminum propeller set for the Sonicwake 24 as a more durable, less flex-prone step up from the stock composite blade.
Whatever prop you land on, run the heat test before you trust it: 20–30 seconds at speed, then bring the boat in and touch the motor can. If you can't hold your finger on it comfortably for 5 seconds, it's too hot — that's an over-prop situation, and the fix is to drop back a size, not to push through it. A safe working target on a water-cooled setup is around 140°F (60°C); anything well above that is asking for a fried ESC or a demagnetized motor.
Prop hardness matters too, in ascending order: plastic, aluminum, carbon fiber, beryllium-copper, stainless steel. A stiffer prop holds its shape better at RPM, which matters more as speed climbs, but it also transmits more load into the shaft and strut — one more reason to size up gradually rather than jumping straight to the hardest material available.
Step 3 — Dial In Trim Tabs
Trim tabs are the piece almost every "faster RC boat" article skips or waves at in one sentence, and they're one of the more measurable, repeatable tuning tools you have.
Most RTR speed boats — including the Spartan and DCB M41 — ship with no trim tabs at all. Adding them is a bolt-on job: a purpose-fit set like the Hot Racing adjustable aluminum trim tabs for the Traxxas Spartan mounts directly with the stock screws, no modification needed. For other hulls, a universal set like these stainless steel adjustable trim tabs works on most mono and vee hulls — buy the biggest pair that physically fits your transom, since larger tabs need less angle to do the same job.
Baseline setup:
- Mount tabs 1/16"–1/8" (roughly 1–2mm) above the hull bottom, parallel to the running surface. Never mount below the transom line — that's pure drag, no benefit.
- Both tabs down slightly = bow pushed down, reduces porpoising, costs a little top speed.
- Both tabs up / neutral = bow rides higher, faster in a straight line, less stable at the top of the speed range.
- If the boat rolls consistently toward one side under power (torque roll, distinct from prop walk), drop the right (starboard) tab down roughly 1/32"–1/16" more than the left to counter it.
Adjust in small increments — a little goes a long way, and overcorrecting with tabs too far down will plow the bow and scrub speed you just spent an evening finding elsewhere. If you're seeing blowover (the bow lifting and flipping backward), tabs-down is your first response, alongside moving weight forward.
Step 4 — Set Your Center of Gravity
Trim tabs fine-tune running attitude; CG sets the baseline. For most monos and catamarans, target roughly 25–35% of hull length forward of the transom — call it 30% as a starting point. The battery is usually the easiest mass to shift, and on RTR hulls with a centralized battery tray, moving it forward or aft even slightly is often enough to kill porpoising (the bow bouncing rhythmically at speed) without touching anything else.
If you're bouncing between chine walk and blowover fixes and nothing quite settles it, check CG before you touch tabs again — a boat that's tail-heavy will fight tab adjustments no matter how you set them, and a boat that's nose-heavy will feel sluggish and resist getting up on plane.
Step 5 — Extend Range Without Losing Signal
2.4GHz radio signal gets absorbed by water far more than air, which is why boats lose control range at distances that would be trivial for a car or plane on the same radio. This isn't a motor or ESC problem, and it's rarely a reason to buy a new battery — it's an antenna placement problem, and it's nearly free to fix.
- Route the receiver antenna up a non-conductive tube or mast, well clear of motor and ESC power leads (electrical noise from those wires degrades reception).
- Keep the antenna vertical — polarization matters, and a horizontal antenna loses range fast.
- Get the tip roughly 0.5m above the waterline where practical; the goal is keeping the active last ~30mm of the antenna clear of water and hull structure, not buried in a hatch.
- Never cut or shorten the receiver antenna to make it fit a smaller mast.
- Do a ground range check before every session where you're pushing distance, and set your throttle failsafe to motor-stop (not last-command) so a dropout doesn't send the boat further away at full throttle.
For most owners running standard 2.4GHz gear at the distances typical of pond or lake use, better antenna placement solves the problem. If you're intentionally running long-distance work — bait boat deployment or dedicated distance runs — an ExpressLRS-based receiver is the enthusiast-grade option, built for extended range at high packet rates, though it's a bigger step than most speed-boat owners need to take.
Common Mistakes to Avoid
- Sizing up a prop without the heat test. A bigger prop that draws more current than your ESC and motor are rated for is the most common way stock electronics get cooked on an otherwise sound boat.
- Treating prop walk and chine walk as the same problem. One is a veer, fixed with rudder/strut offset; the other is a roll, fixed with strut height, tab settings, and prop choice. Applying the wrong fix wastes runs and can make the actual problem worse.
- Mounting trim tabs below the hull line "for more lift." It adds drag, not lift, and works against the tuning you're trying to do.
- Chasing pitch for speed without addressing cooling first. More pitch means more load; if your setup is already running warm, add pitch and you're one hot afternoon away from a dead ESC.
- Skipping the ground range check before a long-distance run, and running the receiver antenna flat against a wet deck instead of up on a mast.
- Ignoring CG and trying to solve porpoising or blowover with tabs alone — tab range is limited, and a poorly balanced hull will fight you no matter how it's set.
Frequently Asked Questions
Q: What prop should I run on a Sonicwake or Spartan for more speed?
Start from the stock-equivalent diameter and pitch, balance and sharpen it first, then step up in diameter by roughly 2mm while keeping pitch the same. That increment is generally safe on these platforms and has been reported to add around 5–6 mph without extra cooling. Anything beyond that should come with improved cooling, since load and heat rise together with prop size.
Q: How do I stop my boat from flipping over (blowover) at speed?
Blowover means too much bow lift. Lower the trim tabs slightly, shift battery or ballast weight forward to move CG closer to the recommended 25–35% of hull length ahead of the transom, and reduce strut angle if your setup allows it. Address it as soon as you see the bow starting to rise unusually high — it gets worse, not better, as speed climbs.
Q: How do I balance an RC boat propeller?
Mount the prop on a magnetic balancer sized to your shaft. Let it spin freely — the heavy blade settles to the bottom every time. File or sand a small amount of material off the back of that blade, recheck, and repeat in small passes until the prop settles randomly rather than consistently on one blade. Finish by lightly sharpening the leading edges.
Q: Why does my boat roll side to side instead of running straight?
That's chine walk, and it typically starts once a hull passes roughly 50 mph as its effective waterline narrows on plane. It's corrected with a combination of settling the hull lower, raising the strut slightly, offsetting the strut to counter torque roll, running a smaller-diameter or less-lifting prop, and trim tab adjustment — not with rudder trim, which is the fix for the unrelated issue of prop walk (veering to one side).
Q: How far will my RC boat go before I lose control?
It depends entirely on antenna placement, not battery or motor power. 2.4GHz signal is heavily absorbed by water, so range collapses fast if the antenna is buried near the waterline or lying flat. Mounting it vertically on a non-conductive mast, clear of power leads, with the tip up around half a meter above the water, is the single biggest factor in usable range for standard 2.4GHz radios.
Q: Is more propeller pitch always faster?
No. Pitch raises theoretical top speed — roughly 200 RPM of change at wide-open throttle per inch of pitch — but it also raises current draw and heat, and can push a hull into cavitation instead of speed if the power system isn't ready for it. Diameter drives thrust and acceleration; pitch drives top-end speed. Increase them independently and test each change with the heat test before assuming it worked.
Conclusion
The order matters here: balance and sharpen what you already have, then reconsider prop diameter and pitch with the heat test as your check, then add trim tabs and set them to numbers you can measure and repeat, then confirm CG, then deal with range separately as an antenna problem rather than a power problem. Most of this costs under $50 total and none of it risks the electronics the way an undersized ESC on an oversized prop does.
If your boat is already stable and you're chasing outright top speed rather than dialing in what you have, the next steps are on the power system side — see our breakdown of RC boat motors and KV ratings and the ESC picks by power class for where headroom actually comes from. If you're shopping for a hull built to take this kind of tuning further, the fastest RC speed boats roundup and the Traxxas model-by-model guide cover which platforms respond best to it. And if a bad prop or bad tuning has already cost you a motor, our troubleshooting guide for a non-responding motor walks through the recovery side of that mistake.